Once you have Enigmail up and runnning, you need to populate it with keys: it's pretty useless without them. You need to have your own key pair in order to sign messages and allow anybody to send encrypted messages to you. Furthermore, you will need the public key of a person in order to send that person an encrypted message, or to verify the signature in a message sent by that person.
Select Enigmail → Key Management to open the Key Management window.
Note for Postbox: the menu Enigmail is only available from the Message Composition window.

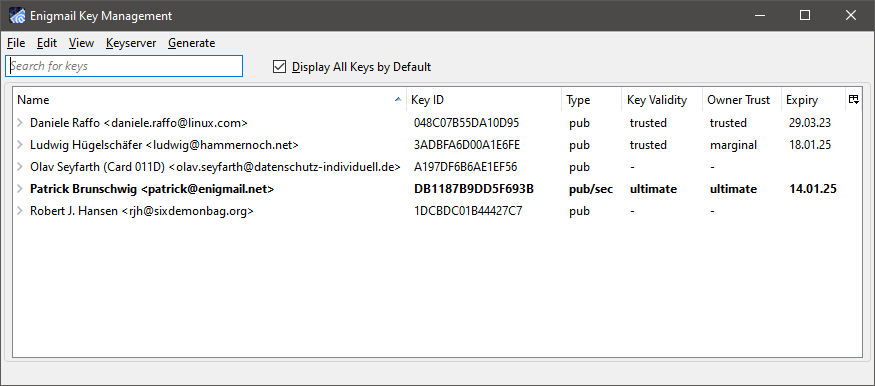
The Key Management window shows all keys (yours and other people's) you have stored on your computer; this is called your keyring. The set of all public keys that you have collected is often called your public keyring.
Key pairs (i.e. a bundle of public key and its companion secret key) are shown in bold. Revoked or expired keys are shown in italic.
If you have run the Setup Wizard and generated a new key pair, or imported an existing one, it will be shown here. (If it doesn't, tick the option Display All Keys by Default.) Otherwise, the window will be empty.
By clicking the expand gadget at the left of each key, you can see the key's additional user IDs and PhotoID, if present. The columns (Key ID, Type, Key Validity, Owner Trust, Expiry, Fingerprint) show a number of other key properties: you can choose which columns you want to see by selecting them in the rightmost gadget in the column header bar. Later we'll explain what these properties mean.
The menu bar of the Key Management window allows you to operate on the keys of your keyring. To do that, select a key, and then choose a menu item. You also have most of these menu items in a pop-up menu that shows up when you right-click on a key. Some menu items will be disabled (greyed out) if the operation is not possible on the key you selected. Some operations on a key require that you have the companion private key, so you can accomplish them on your key pair but not on other people's public keys.
Contents
Operations on your key pair
Once generated, your key pair should show up in the Key Management window. (If it doesn't, tick the option Display All Keys by Default.)
Examining the key properties
Select your key pair and choose View → Key Properties (or double-click the key). A new window will pop up, showing the key's properties; some of these properties are divided into three separate tabs, Basic, Certifications, and Structure. As you've seen, most of these properties can also be viewed directly from the Key Management window.
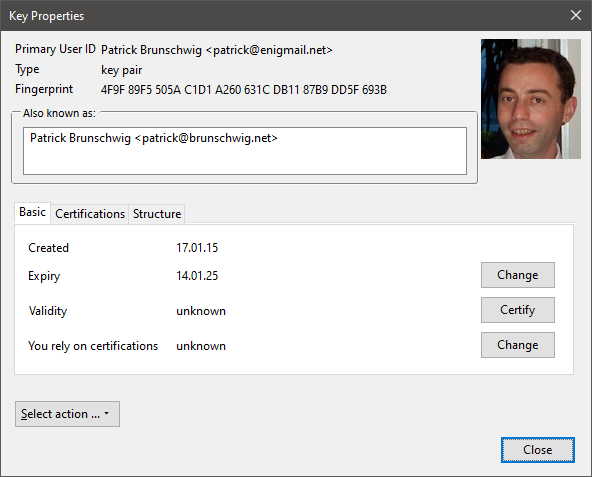
- The Primary User ID is the name and email address associated with the key i.e. the key owner's. These match the name and address of the email account for which you generated the key.
- The Type of the key shows "key pair" (or "pub/sec" in Key Management window) to mean that this is a key pair. For other people's public keys that you have imported, this field will show "public" ("pub" in Key Management window).
- The Fingerprint is a unique 40-digit hexadecimal number that is automatically generated when the key pair is created, by applying a hash algorithm to the key. The fingerprint unambiguously identifies the key worldwide. This means that no key will have the same fingerprint of another key ever created in the whole world. The last 8 digits of the fingerprint make the short Key ID which, being much shorter, can be used to locally identify the key for all practical purposes. While the fingerprint is unique for each key ever created worldwide, you can safely assume that the Key ID is unique for each key in your keyring: you would need to collect dozens of thousands of public keys in your keyring before there is a good possibility that two keys share the same Key ID. Note, however, that it is possible to generate a key pair with a given Key ID, for instance to maliciously impersonate someone; therefore, you should always check the full fingerprint when verifying someone else's keys.
- The Also known as field shows the additional user IDs (name and email address) associated with the key, if any. By default your newly created key pair has no additional user ID: how to add an additional user ID is explained further on.
- Created shows the date of creation of the key.
- Expiry shows the date of expiration of the key. Since this is your key pair, you can choose to change this value should you want to.
- Validity indicates the validity of the key. Key validity will show you whether a key has expired or has been revoked. For the key pair that you just created, validity should display "ultimate".
- You rely on certifications indicates the trust in the key's owner on verifying other keys carefully before signing them. For your own key pair, it should display "ultimate". For other keys it will display what you have entered. The trust property is not exportable, i.e. a specific level of trust is applied to your keyring only, and when a key is exported the key's trust is not exported along with the key.
A drop-down menu named Select action at the lower left of the Key Properties window allows you to perform different operations on the key. The operations you can perform on a key depend whether you have or not the companion private key, so you can accomplish some operations on your key pair only and not on other people's public keys; Enigmail shows only menu items relevant to the permitted operations. The same operations are available from the menu bar within the Key Management window as well.

The Certifications tab shows all the other people's keys that have signed (i.e. certified) this key.

The Structure tab shows all key components i.e. primary key and subkey(s) along with their properties: what the key can be used for (possible values are Sign, Certify, Encrypt, and Authenticate), the key ID, the algorithm used for the key, the key size in bits, the creation date, and the expiration date (if any). Note that the key ID is prepended by the characters 0x, which is the prefix indicating a hexadecimal number.
Once you're done examining the key, hit the Close button to close the Key Properties window and go back to Key Management.
Specifying additional user IDs
You might desire to use more than one email address to send secure email from. In this case, you do not need to generate one key pair for each address: you may simply associate multiple email addresses to your key pair. This will save you from the burden of managing multiple key pairs.
Select your key pair and choose Edit → Manage User IDs from Key Management, or choose Manage User IDs from the Key Properties of your key. A window will pop up to show you a list of all user IDs (primary user ID and all additional user IDs) that are currently associated with the key. If this is the first time you perform this operation, your key will have only a primary user ID.

The Add button lets you add more user IDs. A user ID is composed of a name and email address; it is also possible to put an optional comment.
The Set primary button sets the selected user ID as primary, and as a consequence the previous primary user ID is relegated to the role of additional user ID.
The Revoke button revokes the selected user ID, which is then greyed out and deactivated. Note that it's not possible to delete a user ID - you can only revoke it.
Click on Close window to save the changes you have made to the key and to return to Key Management.
All user IDs are included in the public key when it is sent or exported (except for Autocrypt). This also applies to the PhotoID, which is a special type of user ID.
Adding a PhotoID
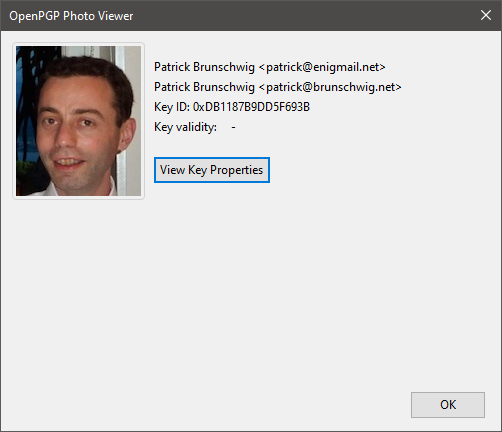
Public keys may have an embedded PhotoID i.e. the owner's photograph. To view the PhotoID, select the key and choose View → PhotoID from Key Management, or click the View PhotoID button from the Key Properties. If the menu item or button are greyed out, the key carries no PhotoID.
To add a photo of yourself to your key, click on your key and select Add Photo from the pop-up menu. Then enter the path of your image file. The file must be a stored in JPEG format (*.jpg). Recommended image size is 240x288 pixels .
The image will be included in your public key similarly to an additional user ID. For this reason, the recommendation is to use JPEG files of maximum 7 Kb, otherwise your public key may become very large.
Changing the passphrase
To change the passphrase that protects your private key, click on your key and choose Edit → Change Passphrase from Key Management, or click the Change Passphrase button from Key Properties. You will be asked to enter the new passphrase twice, to be sure that there are no typos.
Making a backup of your key pair
Once you've generated your key pair and verified its properties, it's a very good idea to make a backup copy of it. Select your key pair from Key Management and click on File → Export Keys to File. You will be asked whether you want to include your secret key in the saved OpenPGP key file:

If you now click on Export Secret Keys, the exported file will contain your whole key pair (secret key and public key). If you click on Export Public Keys Only instead, the exported file will contain your public key only.
Be very careful on how you export your key pair! When backing it up, you must include the secret key, or the backup will be useless. When exporting in order to distribute your public key, make sure you do not include the secret key, or you'll compromise your key pair.
Since you're making a backup now, click on Export Secret Keys, then choose where to save the file. Your key pair will be saved as an ASC file named like
Distributing your public key
Now that you have a key pair, you must distribute your public key around. This is necessary so people can use it to send you encrypted messages and verify the signature on messages you send. You can do this manually and/or by the means of a public keyserver.
On the Key Management window, select your key pair and click on File → Export Keys to File. Again, you will be asked whether you want to include your secret key in the saved OpenPGP key file: make sure you click on Export Public Keys Only this time. Save the ASC file, which will have a name like
This is a copy of your public key; notice the "pub" word at the end of the filename. You can now put the file on your website for people to download it, or carry it around in a USB drive to distribute it to people, or send it via email as an attachment.
Concerning this last option, there is a simple Enigmail shortcut for it: when writing your mail in the Message Composition window, simply click on Attach My Public Key or choose from the menu bar Enigmail → Attach My Public Key and Enigmail will attach it upon sending.
Publish your public key on a keyserver
By far, the easiest way to distribute your public key to the world is to publish it on the public network of keyservers, a global database of keys.
Some people believe it's a bad idea to use a keyserver, because spammers might search them for email addresses. While this is true for certain types of keyservers, certain modern key servers don't allow this anymore.
In order to publish your key, click on your key and select Keyserver → Upload public keys. You will be given a choice of keyservers; the one Enigmail uses by default is vks://keys.openpgp.org.

Click on Ok and wait for your key to be uploaded.
About Keyservers
keys.openpgp.org and keys.mailvelope.com
Certain keyservers periodically synchronize themselves (the so-called SKS keyservers). keys.openpgp.org and keys.mailvelope.com are not among them. If you use one of these two, you will receive an email containing a confirmation link. Your key will only be available for others once you click on that link. If you want to remove your keys from the keyserver, you can visit https://keys.openpgp.org or https://keys.mailvelope.com respectively to do so.
SKS keyserver pool
Uploading a public key to an SKS keyserver is definitive. Once a key is uploaded there is no way to delete it; therefore its associated email address(es) (and its PhotoID, if any) will always be visible when someone searches for it. The key can only be revoked. If you're concerned about this for privacy reasons, don't publish your key on these keyservers. Note that SKS keyservers require no authentication so you don't need to be the owner of a key to upload it; you can theoretically upload anyone's public key to an SKS keyserver, although this is considered bad Netiquette.
Importing public keys
You need someone's public key to accomplish two things: encrypt a message destined to this person, or verify the signature of a message coming from this person.
You might obtain the public key as an ASC file from the person himself, either as an email attachment or by hand. In this case save the file on your computer, then from Key Management select File → Import keys from file. Choose the ASC file you just saved. Enigmail will add this public key to your keyring.
Another way to find someone's public key is to download it from a keyserver. Select Keyserver → Search for keys and insert as the search term a part of the name or email address of this person. You may also search for key IDs. The keyserver will return a list of public keys that match. Tick the checkboxes on the left of any key you would like to import and Enigmail automatically will do it for you. Later, you can also refresh your public keyring in part or as a whole via the menu commands Keyserver → Refresh Selected Public Keys and Keyserver → Refresh All Public Keys.
You might also find a public key published as raw text, for instance in a personal web page. It will appear like this:
-----BEGIN PGP PUBLIC KEY BLOCK-----
Version: GnuPG v1.4.9 (MingW32)

mQGiBEgN3cERBAC+2os2hoACip4EiKxEzv+iVHOWaznOJIGZY9zY4y8C0BhUP++q
ccgO9vgNO1vIXApYvJctwX9HFJieNdlsBrWOR69hPBAbDo+3BbOKwJFYgq8akYnv
tBCOdCNfOFwQs/8XdOH25/Oig+UjKhgxwKjkdd1UCj7shdGioXOvjO13xwCgzrGa
k2oA9Bne3hW+jUPjJlU4UbkD/i7mbQfFwTgxcXfRfsVDnkmPc+QvKe00ajfRP31o
(... 30 lines omitted...)
3bRLiE8EGBECAA8FAkgN3cECGwwFCQlmAYAACgkQW9ZLGa9iatRGlACeIyyIBTGj
uhrZRubL8gSdI3HyPzEAnAqWD1g+DvEHyEOZ0/2rUcsj7CT2
=3RyK
-----END PGP PUBLIC KEY BLOCK-----
This is also what you see if you open a public key ASC file with a text editor.
Select the whole block of text, including the lines -----BEGIN PGP PUBLIC KEY BLOCK----- and -----END PGP PUBLIC KEY BLOCK----- and copy it to the clipboard (Ctrl+C under Windows). Then choose Edit → Import keys from Clipboard to import this public key into your keyring.
Once you import someone's public key, you will be shown this dialog indicating the identity of the key owner, the key's length, creation date, and fingerprint:

You can search and add public keys to your keyring at any time. Enigmail will also offer to do so automatically when you receive a signed message from someone and you do not have his public key.
If you followed all instructions up to here, by now your keyring should contain your own key pair and a number of public keys purporting to other people.
Validity of public keys
Importing a public key from a keyserver is quick and easy. If you use keys.openpgp.org or keys.mailvelope.com, there is a certain assurance that the keys found belong to the owners of the email address(es) contained in the key (due to the email verification process).
If you use SKS keyservers, there is no guarantee that the key really purports to the person specified as the user ID. After all, anybody could have generated and uploaded that key. In fact, SKS keyservers contain several fake keys, especially ones pretending to belong to prominent people.
Furthermore, if you received someone's public key via email, you should know that there is an inherent security problem in using the same channel (e-mail) both for key distribution and for the exchange of messages secured by that key. Theoretically, an attacker that is able to compromise the channel can replace the public key in transit with a rogue public key of a key pair he created himself (man-in-the-middle attack). The attacker can now intercept the message that was encrypted with the rogue public key, and decrypt it since he owns the companion private key.
Verification of public keys
A solution to this problem is to check the public key's fingerprint with the key owner through a different channel. You may phone the key owner and have him read the key fingerprint to you. If the fingerprint does not match, you both know that the key was replaced in transit or you were otherwise given a fake key.
However, the best way to verify other keys is to meet the person face to face, check his identity my means of an official document (e.g. his passport), receive the fingerprint of his key and let him state which mail addresses are associated with this key. How to do this properly is shown in detail in this section.
Signing other people's keys
If you have verified a public key, you should tell it to the OpenPGP community. This is done by signing your correspondent's key. Signing is needed to make this key valid and useable for you.
In Key Management, select that particular key and then the menu item Edit → Sign Key, or right-click (CTRL-click on Mac OS) and select Sign Key from the appearing popup menu. Then the signing dialog will open:

The key to be signed is shown with its User ID (name and e-mail address) followed by the Key ID. The following line shows the fingerprint of the key; you should check it carefully.
The third line shows the secret key your are signing with. In most cases, you have only one key pair so there will only be one, otherwise you can select your secret key from the drop-down menu.
You are asked how carefully you have verified that the key you are about to sign actually belongs to the person named in the first line:
- I will not answer - This is the default. Select this option if you don't want to tell anybody how you verified this key.
- I have not checked at all - You should only choose this option if you want to keep your signature local.
- I have done casual checking - You can choose this option if you have e.g. received the fingerprint by phone and not met the person yourself
- I have done very careful checking - Only select this option if you have met the person and carefully checked the person's ID document and key fingerprint.
Note the checkbox Local signature (cannot be exported) at the bottom. Check this if you do not want your signature to be public. This is very helpful when you have not met the person and only want to validate that key for local use.
If you later – after meeting face to face and doing a thorough verification – decide to issue a public (exportable) signature, you can then repeat this step without checking the Local signature box. The exportable signature then replaces the local signature.
Click on Ok to sign the key. Your signature will be attached to that public key; if the key was already signed by other people, your signature will be added to the list. When a key is exported, the list of signatures is exported with it.
Once you have signed a public key, you should return it (for instance in a signed email message) to the owner so he can redistribute it and upload it again on a keyserver. Note that keys.openpgp.org ignores all signatures. You can upload your public keyring to a keyserver by the means of the menu command Keyserver → Upload Public Keys, but doing this without consent of the public keys' owners is not considered good netiquette, and in the case of keys.openpgp.org and keys.mailvelope.com, will trigger many emails.
Owner Trust
Note: the Owner Trust functionality is only available if you use GnuPG.
A quick note in advance: Owner Trust is one of the most misunderstood expressions in the OpenPGP context. In fact, the parameter Owner Trust does not say anything about the owner's key or if it should be treated as valid or not, but rather tells OpenPGP how it should consider other keys signed by this owner's key.
You alone decide how much you trust the practice of that particular key signer. In the previous example, Alice could decide that she does not trust the keys signed by Bob's key, because she knows that Bob happily signs any public key he gets his hands on without caring to verify the owner's identity. In this case she sets the owner trust level of key 0xBBBBBBBB (the key Bob uses to sign other people's public keys) to "None". Carol's public key 0xCCCCCCCC will therefore not be calculated as valid in Alice’s installation if there is no other trust path.
Therefore, Owner Trust refers solely as Bob's capacity to properly validate public keys. It does not infer anything else concerning Bob as a person, such as his trustworthiness, his being a law-abiding citizen, or any of his moral qualities. It does not concern, neither, the content of Bob's messages being truthful or not.
You should only change Owner Trust for a person if you have seen him/her in real life how careful he/she is checking identity, fingerprint, and e-mail address(es) of other key holders. The best reference to judge is how he/she checked your identity.
There are five levels of Owner Trust:
- Unknown. Nothing can be said about the owner's judgement in key signing. This is the trust level initially associated to other people's public keys in your keyring.
- None. The owner is known to improperly sign keys.
- Marginal. The owner is known to properly sign keys.
- Full. The owner is known to put great care in key signing.
- Ultimate. The owner is known to put great care in key signing, and is allowed to make trust decisions for you.
You can set the level of trust of a particular key by selecting that key and choosing the option Set Owner Trust from Key Management, or from Key Properties itself.The function is only available for your own keys, and for keys that you signed. You alone decide which level of trust to assign to a key, and the trust is assigned only locally. This is considered private information: it is not included with the key when it is exported, and is stored in a separate place from your keyring.
The trust level of your own key pair should be the maximum (I trust ultimately); if not – this can happen if you imported a key pair – you can correct this via the above procedure.
Criteria for Key Validity
By default, keys signed by your key are automatically considered as valid (locally, i.e. in your keyring).
Remember: The owner trust level is a local setting, and as a consequence the calculated validity of a key is unique for your local installation of GnuPG. Therefore, a key you consider valid might be considered invalid by someone else.
A key is considered valid if it has been signed by at least one key with "full" owner trust, or by at least 3 keys with "marginal" owner trust. In addition to that, the path leading from that key back to your own key must be 5 steps or shorter. For instance, Alice signed the key of Carol. She saw that Carol carefully verifies other keys before signing, so she sets the owner trust on her key to "full". Alice didn't meet David, but Carol signed David's key, so David's key is considered valid in Alice's keyring.
"Ultimate" owner trust bypasses any restrictions on how many fully trusted signatures are needed to make a key valid: any key signed by an ultimately trusted key is always valid. You can set ultimate trust to a particular key you want to allow to make trust decisions for you. This should only be done with extreme caution.
You can see the calculated validity and your assigned owner trust value in the Key Management or Key Properties window, in the fields Key Validity and Owner Trust. You may have to expand all columns to get a similar view:
Importing an existing key pair
Perhaps you have already used GnuPG, Enigmail, or any other OpenPGP software in the past, and you generated a key pair in that occasion. If you didn't do so already using the Enigmail Setup Wizard you might want to use your existing key pair in this installation of Enigmail. Make sure you remember the passphrase of your old key pair, otherwise you will be unable to use it.
To import your key pair, choose File → Import Keys From File and select the file containing your key pair. Your key pair will be imported for you to use it.
Generating your own key pair
You can create a key pair at any moment by selecting Generate → New Key Pair. (If you already own a key pair, most likely you won't need to generate another.) A window will open:
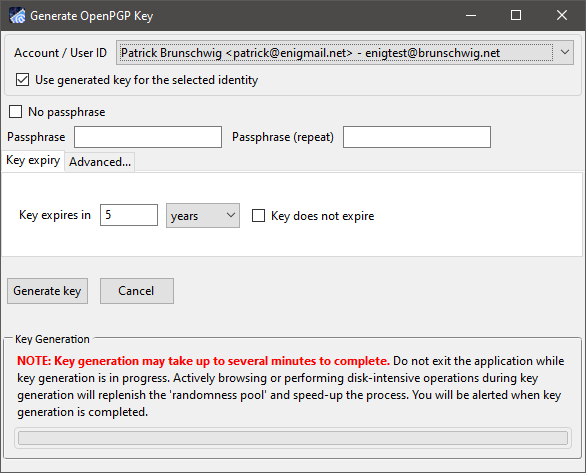
To successfully generate a key pair, you must proceed through the following steps.
Tell Enigmail which account to use
The Account/User ID drop-down menu shows all your email accounts and identities you have configured in Thunderbird: you must select one to associate to this key pair. Select whichever account will be receiving encrypted mail, and make sure the option Use generated key for the selected identity is ticked. Should you decide later that you want to change the email address associated to the key pair, or use the same key pair for multiple email addresses, you can do this easily.
In the Comment field you can write something about this key pair. This will help you distinguish keys for different purposes. The comment is optional and, if set, it will appear next to the User ID. Note that the comment will also appear in the exported public key that you distribute to other people.
Choose when the key expires
It may happen that some day you lose your private key or your passphrase, and therefore are unable to use your key pair. It may also happen that your private key gets compromised e.g. an intruder manages to have access to your computer and steal your key pair, or you send someone your private key by mistake. Furthermore, there might be some breakthrough in cryptanalysis or simply the discover of a weakness in a cryptographic algorithm, although this possibility is more remote. In this case, the cipher and key size you chose for your key pair many years ago could be unfit for offering valuable security in today's standards.
In all these unfortunate cases, it is a good idea to have defined a key pair that is valid only for a limited period of time.
The Key Expiry tab allows you to limit the lifespan of your key pair. After the allotted time, the public key will automatically be marked as invalid (expired), and people will be prevented to use it. The messages previously encrypted and signed with that key pair will still be decryptable and verifiable, though. Once your key pair has expired you can either extend the expiry time or you can generate another one, and distribute around your new public key. A good time lapse for key expiration is between 3 and 5 years. You may also choose to have a key that never expires, although we do not recommend to do so.
It is recommended to create a revocation certificate that you can use at any time to mark the key as invalid; this will be explained further on.
Choose the key type and size
By clicking the Advanced tab you can choose some properties used for the generation of your key pair: Key size (3072, or 4096 bits) and Key type, which defines which algorithm will be used - RSA or Elliptic curve (ECC). Basically, the larger the key size, the stronger the key, the greater the processing power requested for encryption/decryption. If you are exchanging mails with people using older OpenPGP software, you should probably choose an RSA key. Otherwise, you don't need to overthink it: you can safely choose the default option (ECC key) which offers excellent security coupled with a good usability.
Start key generation
Once you've made all these choices, simply click on the button Generate key.
Choose a passphrase
Upon clicking on Generate Key, GPG-agent will ask you what the secret passphrase should be for your new key pair.
Your private key is all you need to send signed messages and decrypt messages that you receive on your selected email account. Should the private key fall in other hands, this would allow someone else to sign messages on your behalf and decrypt messages that were supposed for your eyes only. Luckily, OpenPGP uses an additional layer of protection: the private key is protected with a secret passphrase. Choose something for your passphrase that is easy to remember but very hard for someone to guess.
If you forget your passphrase, you will be unable to use your private key. There is no way to recover the passphrase. Your only hope is to try to remember what the passphrase was. This is a security feature of OpenPGP and cannot be circumvented.
After entering your passphrase twice, Enigmail will generate the key. Your computer makes use of a great quantity of random numbers in order to create the key. You may speed up the process by using the computer in the meanwhile, or simply by randomly typing on the keyboard or wiggling the mouse around to generate more randomness. On a modern computer, a standard 4096-bit RSA key pair takes no more than a few seconds to generate.
Congratulations! You just created your first key pair.
Generate the revocation certificate
As said before, it may happen that your private key gets lost or compromised. In this case it is of crucial importance to have a revocation certificate for that specific key pair.
Once it finishes generating your key, Enigmail will offer you to also generate such a certificate. If you accept (which we recommend), click on Generate certificate. You will be asked where to save the revocation certificate file. The revocation certificate file has an ASC extension to indicate it's in ASCII-armored format. This is the common file format for exported certificates, key pairs, public keys, and all exported output of Enigmail in general.
Keep the revocation certificate in a safe place and not on the same computer you installed Enigmail, so if you even lose your key pair (e.g. due to a hard drive crash) you don't lose the revocation certificate with it. An external hard drive, where you can also put a backup copy of your key pair, will be fine.
The revocation certificate can be used to invalidate your key pair at any time. You do not need to type your passphrase or physically have in your keyring the key pair you are revoking, so this will work great even if you forgot your passphrase or accidentally deleted your key pair. However, keep in mind that anyone having access to the revocation certificate can revoke your key pair! You may also generate the revocation certificate at any later time by selecting your key pair and choosing Generate → Revocation certificate.
Revoking your key pair
If you lose your key pair, feel that it has been compromised, or simply don't want to use it anymore, you should revoke it.
You can use the revocation certificate that you generated in advance (or at least that's what you should have done!) to invalidate the key pair. Select File → Import keys from file from the Key Management window and choose the ASC file containing your revocation certificate.
If you do not have your keys any longer but the revocation certificate only, then you must first get your public key e.g. from a keyserver or a mail correspondent. Then import your revocation certificate via File → Import keys from file from the Key Management window, and choose the ASC file containing your revocation certificate.
If you did not generate the revocation certificate in advance, you can revoke the key on the fly, provided that you still have your key pair and you remember your passphrase. To do so, select the key pair you want to revoke and click on Edit → Revoke key. This effectively creates a revocation certificate and imports it in one shot.
Send the revoked public key to all your contacts and warn them not to use it any more. If you published your public key on a keyserver, remember to upload again the revoked public key to it.
A revoked public key will be marked as invalid in Key Management. It cannot be used anymore to encrypt messages to the key's owner; however, it can still be used to verify signatures.
Note that after you revoke your key you can still decrypt messages that were encrypted with that key (provided that you still have the private key, of course); this allows you to read old encrypted messages.
You are also able to decrypt messages sent to you with the revoked key after the revocation. This should not happen as the revoked key is not supposed to be used to encrypt; however, people that haven't refreshed your key in their keyring in a while (and that therefore still have the old, non-revoked copy of your public key) will still be able to do so.